Affiliate Disclosure
This post contains links through which we may earn a small commission should you make a purchase from a brand. This in no way affects our ability to objectively critique the products and brands we review.
How To Apply Self Tanner: A Step-by-Step Guide
Research-Based Article
Evidence Based Research To fulfill our commitment to bringing our audience accurate and insightful content, our expert writers and medical reviewers rely on carefully curated research.
Read Our Editorial Policy


Self-tanners offer a safe way to get a summer tan without risking skin damage from harmful UV rays.
However, between the patchiness from dry skin, getting those hard-to-reach areas, and turning an alarming shade of orange, self-tanning veterans (like myself) know all too well that achieving good results from a tan in a bottle can be easier said than done.
In this article, I will provide you with the perfect step-by-step guide to applying faux tan and achieving a natural-looking glow that will be the envy of every cookout and beach bash you attend this summer.
Why You Should Be Using Self-Tanner
In the last few years, western society has begun to catch up to what most of the world has known for centuries—excess sun exposure can lead to signs of premature aging and deadly skin diseases.
Need more proof? We have some great educational articles about the health effects (and benefits) of sun exposure and reasons why you should wear sunscreen in the winter, when it’s cloudy, and even inside if you sit near a window.
Unfortunately, this means that—especially for the melanin-challenged like myself—any amount of tanning is a sign of skin damage.
But what if you’re not willing to give up that golden glow? Enter self-tanners. Self-tanners can be a great way to achieve a natural-looking tan without increasing your risk of skin cancer.
Though they can be challenging to apply, a few hours out of your day every two to three weeks is a small price to pay for healthy, cancer-free skin.
Furthermore, this guide will help you simplify the self-tanning process and make it less of a headache to apply and achieve a natural tan.
How Self-Tanner Works
Before we dive in, it might help to understand how self-tanner works. This can help explain why some of the most annoying issues with self-tanner occur, such as patchiness and the orange hue.
Self-tanners contain an active ingredient called dihydroxyacetone (DHA). DHA is a simple carbohydrate that reacts with the amino acids in the dead cells on the surface of the skin.
This reaction, known as the Maillard reaction, produces a pigment called melanoidin, which gives the skin a tanned appearance.
(Side note: If you’re a cooking nerd like myself, you may recognize the “Maillard reaction” as the same chemical reaction that occurs when food browns as it cooks. But don’t worry, no damage is happening to your skin!)
This is why you can sometimes get patchy results if you don’t exfoliate your skin or moisturize well the day before applying self-tanner. The DHA will absorb more readily into those dry patches and become darker than the rest of your skin.
Additionally, the orange color can result from over-application or using a product with a high concentration of DHA.
Skin chemistry and undertone also play a role since some people may naturally develop a more orange tone.
Is Self-Tanner Safe?
The active ingredient in self-tanners (DHA) is generally considered to be safe and has been approved by the FDA for external use.
It’s important to avoid inhaling or ingesting self-tanning products and to keep them away from mucous membranes, such as the eyes, nose, and mouth.
The main issues individuals may experience with self-tanners are skin irritation or allergic reactions but this is unusual. This is why it’s important to test patch before applying it to your entire body since this could cause serious harm to your skin if you end up being allergic.
Overall, though—unlike UV tanning either under the sun or in a tanning bed, which increases the risk of skin cancer and accelerates skin aging—self-tanners are a far safer alternative to achieve a sun-kissed look without harmful sun exposure.
Step-by-Step Guide to Applying Self-Tanners
Okay, now for the fun part—let’s get tanning!
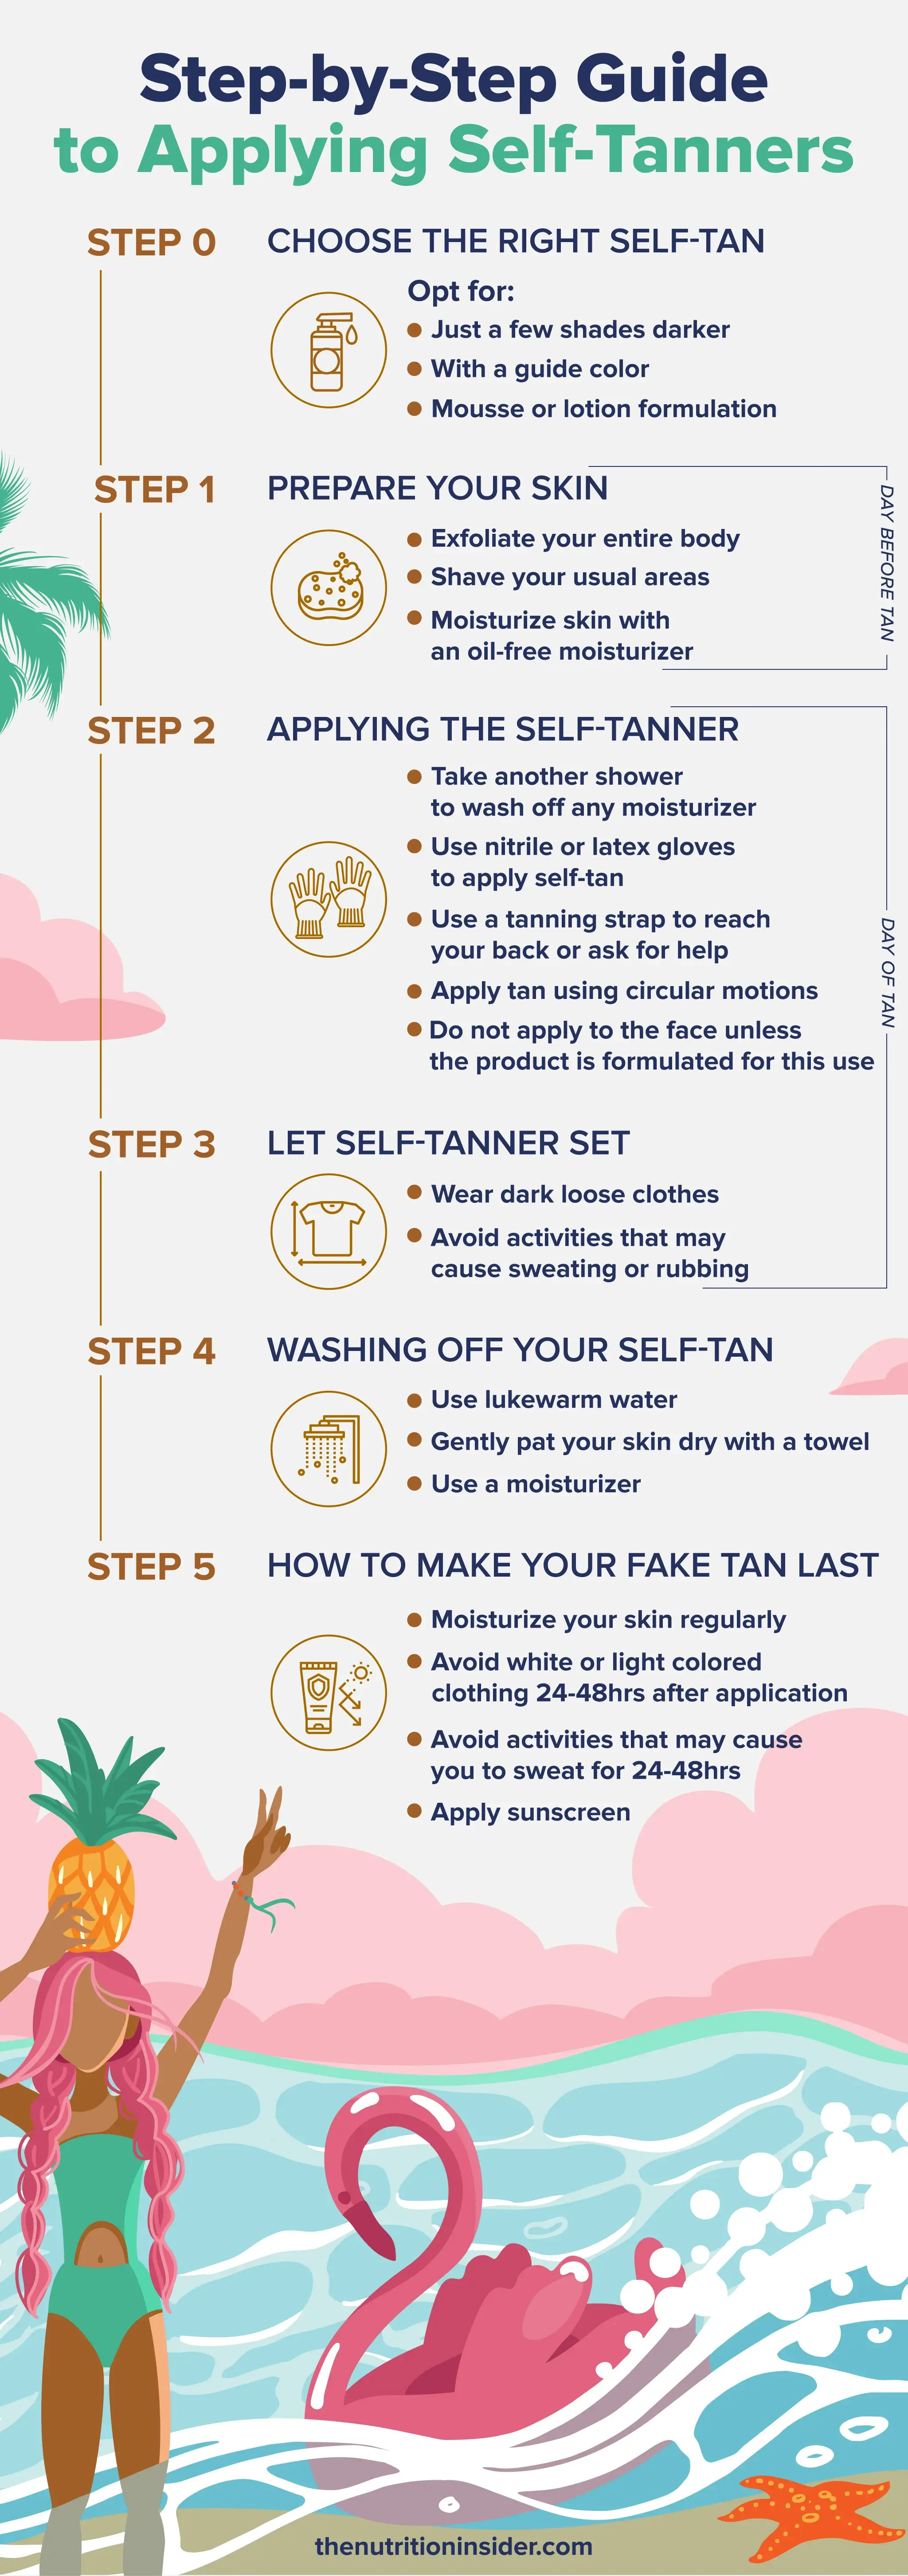
Step 0: Choose the Right Self-Tan
Before we begin prepping for our self-tan, we, of course, have to choose the right product for our skin.
We recommend trying one of the three best self-tanners on our list. But if none of those strike your fancy, we have a few pointers to help you choose the right one.
First, we recommend choosing a product that is just a few shades darker than your natural skin tone. For example, if you are pale and choose an “ultra-dark” tan, this may result in that orange hue we’re trying to avoid. This is because darker self-tanner contains more DHA, the active ingredient responsible for changing our skin tone.
You should also choose a product with a color guide. This is a common ingredient formulation in self-tanners that does not deposit color but is a temporary tint that allows you to see where the product is on your skin so you can make sure it’s spread evenly and prevent streaks and patchiness.
Finally, choose the right formulation for your skin type and desired effect. If you want a quick, fast-drying application, go for a mousse, which is the most common formulation for self-tanners. You could also opt for a lotion, which is great for beginners and tends to be better for those with dry skin.
Other types of formulation for self tanners include towelettes and sprays. However, I recommend avoiding these. Sprays still need to be rubbed in to ensure even application (so you might as well go with a mousse or lotion), and towelettes often lack a color guide, meaning you may run out of product without realizing it and end up with a patchy tan.
Step 1: Prepare Your Skin
Proper preparation of your skin before self-tanning is probably the most important step to achieving an even and natural-looking tan.
First, exfoliate your entire body with a shower sponge, loofah, or washcloth to remove dead skin cells. This will help prevent patchiness caused by dry skin. In particular, pay special attention to rough areas like elbows, knees, and ankles.
If you shave, make sure to shave your usual areas at this point. Shaving can sometimes take away skin cells which will strip away self-tan with it.
Once you’re done, massage an oil-free moisturizer into your skin to keep it nice and hydrated.
It’s essential that you do this step the day before you apply self-tanner—not the day of! Otherwise, your self-tan can deposit in your skin’s pores, creating a “strawberry” effect after washing off your tan.
Step 2: Applying the Self-Tanner
On application day, take another shower to wash off any moisturizer you applied. Be gentle with your skin and do not scrub.
If you have stubborn dry patches, use an oil-free moisturizer only on those areas to avoid extra product depositing there.
Now that your skin is perfectly prepped, you’re ready to apply the self-tanner.
Most self-tanner brands provide or recommend the use of a tanning mitt to avoid orange palms. However, I have found that mitts tend to absorb more product than they deposit, leading to product waste.
Instead, I use nitrile or latex gloves to apply self-tan. This not only still works to prevent errant stains on your hands but also applies product just as evenly as tanning mitts.
To reach those hard-to-reach places like your back, use a long-handled applicator or a long tanning strap like this one, or enlist the help of a friend to ensure even coverage.
Apply the self-tanner evenly across your entire body, covering all areas, including your feet. For a streak-free tan, apply the self-tanner in circular motions instead of long streaks.
If the product indicates, you can add another layer if needed, but it may be better to wait and see the results after one application before applying more.
If you apply it without gloves or a tanning mitt, immediately wash your hands. If you are using them, use a makeup brush or sponge to apply self-tanner to the backs of your hands, avoiding your knuckles which tend to be dryer and unevenly absorb product.
For your face, use a product specifically made for facial tanning (I like the Tanology Face Drops) that includes a moisturizer. Apply it in small circular motions to ensure even coverage, especially if there is no guide color, which is common for face tanning products.
Step 3: Let Self-Tanner Set
After applying the self-tanner, wear dark loose clothes to prevent staining lighter fabric. Tight clothes can absorb self-tan product and create creases in your tan.
Depending on the tanner, it can take between 3-5 hours for the self-tan to develop.
Some tanners can even be worn overnight, but this can be tricky if you have light bedding or are sensitive to scents (speaking from experience).
Be patient and avoid activities that may cause sweating or rubbing until the tanner has fully set.
Step 4: Washing Off Your Self-Tan
Times up! It’s time to hop in the shower and get this tanner off.
Use lukewarm water and avoid using harsh soaps or exfoliants that can strip away the tan.
Gently pat your skin dry with a towel instead of rubbing to help maintain the tan’s longevity.
Use a moisturizer immediately afterwards, preferably a body oil, to help keep your skin hydrated and hold in your fresh tan.
Step 5: How to Make Your Fake Tan Last
Once your tan is set, the key to making it last is to moisturize, moisturize, moisturize.
Regular skin hydration is essential for making your self-tan last and extending its life through your vacation and beyond.
In particular, I recommend you avoid activities that may cause you to sweat immediately after application day (about 24-48 hours), as this can cause odd-looking patches.
If you do go workout, don’t wear white or light-colored clothing. Speaking from experience, your sweat may cause your self-tan to leach into your clothing.
I find that after one or two days or a couple of showers, the tan is fully set, and you can sweat to your heart’s desire.
As always, if you do go out into the sun to show off your beautiful tan, apply plenty of sunscreen to protect your skin from harmful UV rays!
FAQs
Should you apply lotion before self-tanner?
Yes, applying lotion before self-tanner is recommended if you have stubborn dry patches. However, it’s essential to use an oil-free moisturizer. Focus on moisturizing dry areas like elbows, knees, ankles, and any other dry patches to ensure even application and prevent patchiness. Allow the lotion to fully absorb into your skin before applying the self-tanner.
How long after applying self-tanner can I sit down?
After applying self-tanner, it’s best to wait at least 15-30 minutes before sitting down to allow the product to dry and start developing. This helps avoid any transfer or smudging of the tanner. Wearing loose, dark clothing can also help prevent any staining while the tanner sets.
How long should I leave my self-tanner on?
The recommended time to leave self-tanner on varies by product, but generally, it should be left on for 3-5 hours to develop fully. Some products are designed to be left on overnight for a deeper tan. Always check the instructions on your specific self-tanner for the best results. If in doubt, it’s better to leave it on for the minimum recommended time and reapply later if needed.
You Might Also Like

The 7 Best Multivitamins for Women in 2024
We’ve evaluated the best multivitamins for women and have narrowed it down to eight contenders. Pick the one that best fits your needs and budget.
Read More
How to Live Longer: 10 Foods for Longevity
If you want to know how to live longer you’ll need to change your diet. Read this article to learn about some of the best diets for longevity.
Read More